

Q. Our holiday hours aren't being added to our employees' hours; I always have to add them manually. What am I doing wrong?
A. Holiday hours should be applied automatically in the TimePilot system, as long as your Holiday Schedule has up-to-date holidays, the correct holiday schedule is applied to your employees and your employees are entitled to holiday pay. Here’s what to check:
- Verify that your Holiday Schedule has the current year’s holidays. Start TimePilot Central, then click the “Setup” menu. Choose “Holiday Setup” from the drop-down menu. The Holiday Setup box should appear. You probably have at least one Holiday Schedule listed in the left panel. Click it and then click the “Edit a Holiday Schedule” button. If the holidays listed are out of date, you can change them here.
- If you have more than one Holiday Schedule, verify that the correct one is applied to your employees. You can check that by opening each employee’s profile (“Setup Menu” > “Profile Setup” > Click an employee’s name > “Edit a Profile”). The Holiday Schedule assigned to them is listed at the bottom of the box.
- Are your employees entitled to holiday pay? To check, go to "Setup Menu," highlight the employees' Pay Type and click the "Edit a Pay Type" button. Make sure you've clicked "Yes" as the answer for the fourth question: "Do employees of this Pay Type qualify for holiday pay?"
Before making any changes, however, you might want to read the article on the right side of this newsletter with tips on creating Holiday Schedules. If you’re still having problems, our tech support specialists would be happy to help. You can contact them by phone at 1-630-879-6400 or e-mail at Support@TimePilot.com.
Q. I have TimePilot Vetro, and I can’t transfer my changes to the clock. The user manual says to go to the Setup Menu in TimePilot Central and then click “Transfer Changes to Vetro Clock Using USB.” I do not have that option in my Setup Menu. What am I missing?
A. It appears you are missing the Vetro Data Manager, a small program acts as the "bridge" between TimePilot Central and the Vetro clock. Here's how to get it: Exit TimePilot Central, then insert your TimePilot software installation CD and choose “Install TimePilot Software,” “TimePilot Installation Menu” (not the Installation Wizard) and lastly “Vetro Data Manager.” After installing the Vetro Data Manager you should now have the option to transfer your changes to your Vetro clock.
Q. How do I set the time and date on the Tap clock?
A. First, make sure the Tap Manager is running on your PC, then simply plug the clock into the computer. Three things happen automatically: Clock-in and clock-out data on the Tap clock is downloaded to the computer; the time and date is updated on the Tap clock (using the time and date on your PC or server); and the battery is recharged.
Q. We have a TimePilot Standard clock and use TimePilot software version 4.0. We want to assign an iButton to a new employee, but we can’t find our manual. Can you tell us how to do it?
A. Sure can. First, start TimePilot Central and open the employee’s profile. (Setup Menu > Profile Setup > click the employee’s name and then “Edit a Profile.”) Find the “Identification” section on the right side of the profile screen.
Now you have two options. You can:
- Type the number directly from the iButton. It's the incredibly-hard-to-see 12‐digit number on the metal face of the iButton. Click “Save” to finish the process. This option isn’t recommended, unless you have the eyes of an eagle.
- A much better way is to have the TimePilot Standard clock do the work for you. Click the "Get iButton number" button. The "Get iButton Number" box will pop up. Tap the new employee’s iButton to one of the iButton probes on the Standard timeclock. The clock will read the number and enter it into the software. Next, choose the color of your keyfob and click "OK" to close the "Get iButton Number" box. The employee profile should now show the employee’s iButton number and the color of their keyfob. Click “Save” to finish the process.

You live in the past. About 80 milliseconds in the past, to be precise. Use one hand to touch your nose and the other to touch one of your feet at exactly the same time. You will experience them as simultaneous acts, but it didn't really happen that way: It takes more time for the signal to travel up your nerves from your feet to your brain than from your nose. The explanation is simple: Your brain waits for all the relevant input before it experiences the “now.” Experiments have shown that the lag between things happening and us experiencing them is about 80 milliseconds.
Flash ... Bang: Since light travels at 186,000 miles per second, you see the lightning the instant it flashes. But the sound of thunder travels about a mile in five seconds near the ground. Below is a chart showing the time span between the flash and the bang and your distance from the lightning strike.
|
Time |
Distance |
|
10 seconds |
2 miles |
|
5 seconds |
1 mile |
|
2½ seconds |
½ mile |
|
1 second |
1,100 feet |
|
½ second |
550 feet |
|
||||
 Setting up holiday schedules in the TimePilot software is
pretty straightforward, but there are some things you can do that will get the
job done more quickly and efficiently.
Setting up holiday schedules in the TimePilot software is
pretty straightforward, but there are some things you can do that will get the
job done more quickly and efficiently.  Want to save even more time? When you're entering your holiday schedule in the TimePilot software, you'll see slots for 20 holidays. Most companies don’t have 20 holidays in a single year. (If your company does, please let us know!) After you fill in your holidays for the upcoming year, keep going and fill the remaining slots with the holidays for the following year, too.
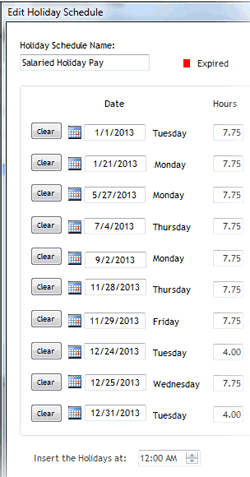


Every once in a while, our employees come across “cool stuff.”
This is where they share their finds.
Writing-Fonts
Here’s an idea: Give a person their very own font—in their own handwriting. You can use the font anywhere you’d use any font: on printed documents, e-mails, etc. Here’s how it works: You download a form from Writing-Fonts.com and print it on your printer. The form has spaces for you to write the alphabet, numbers, various punctuation marks and your signature. Then scan the form and upload it to Writing-Fonts. They’ll convert it to a font, which you download, ready for use. The web site offers clear instructions for the whole process, which takes about 15 minutes. Each font costs $9.95.
Also, if your handwriting is like ours—just about impossible to decipher—Writing-Fonts.com also offers 12 very legible handwritten fonts for free. |

|
TimePilot Corporation
340 McKee St.
Batavia, IL 60510
|
Phone: 630-879-6400
E-mail: Info@TimePilot.com
Web site: https://TimePilot.com
|
| © Copyright 2012, TimePilot Corp. All rights reserved.
|
|