TimePilot Definitions
Early/Late
What’s Early/Late?
This function will label certain transactions in TimePilot Central with one of
the following terms: Early, Late, Unscheduled or OK. The terms appear in the "OnTime"
column, and allow a supervisor to see at a glance which employees started or ended work
early or late, or worked when they were not scheduled. The employee's work hours
aren't affected; it's simply a notification for supervisors. Supervisors can change the label to "OK" when they modify a transaction. For instance, a supervisor might remove the "Late" label from a transaction posted by an employee who had permission to arrive late. The setup screen allows you to set the number of minutes of leeway for each term.
Early/Late is set up when you set up or edit a
shift and is applied to employees in their
Employee Profiles. To set up
Early/Late, follow these instructions:
- Click the "Setup" menu item, then click "Shift Setup."
- Choose the appropriate action, either "Add a Shift Schedule" or "Edit a
Shift Schedule." If you want to edit an existing shift schedule, click on
the name of the schedule first, then the "Edit a Shift Schedule" button.
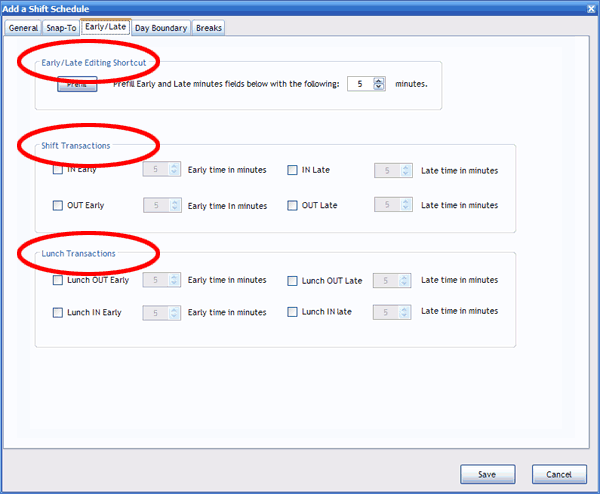
- When the "Add a Shift Schedule" box appears, click the "Early/Late" tab.
- There are three groups in the box: the "Early/Late Editing Shortcut,"
"Shift Transactions" and "Lunch Transactions."

- Let's look at Shift Transactions and Lunch Transactions first. In those
groups, you can set the number of minutes that have to pass before the Early, Late,
Unscheduled or OK label appears in the Transaction List. If you want to be
alerted to employees clocking in early or late at any time, you'd check all the boxes in
each group and set the number of minutes that must pass.
The top item, Early/Late Editing Shortcut, is a way to set things up quickly. If
you enter the number of minutes that must elapse before the Early, Late,
Unscheduled or OK labels are triggered and then click the "Prefill" button, all
eight possibilities in the Shift Transactions and Lunch Transactions will be
checked and the time for each will be set at the time you entered.
- Click Save and close the Shift Setup box.
- Now open the Employee Profile of the worker who you want to track.
(TimePilot Central > Setup > Profile Setup, then click on the name of the
employee and the Edit a Profile button.)
- On the screen that appears, enter a check in the "Enable
Late/Early Tracking" box (it's on the lower right side of the screen), click
Save and close the Profile Setup box. See the example below for how to use
this feature.
Example: Let's say you want to see which employees are arriving more than 5 minutes late at the start of their shift and leaving more than 5 minutes early at the end of their shift.
- First, click the checkbox next to "IN Late" in
Shift Transactions and set the Late Time in Minutes to 5.
- Next, click the checkbox next to "OUT Early" and sent the Early Time in
Minutes to 5. You should end up with settings like this:

- Click Save.
- Now turn on Early/Late monitoring for the employees you want to monitor
by going to their profile (Setup > Profile Setup > Click on a name and click
"Edit a Profile") and checking the "Enable Early/Late Tracking" box.
- You'll see the word "Late" in the
TimePilot Central OnTime column if
those employees clock in more than 5 minutes late or leave more than 5
minutes early.
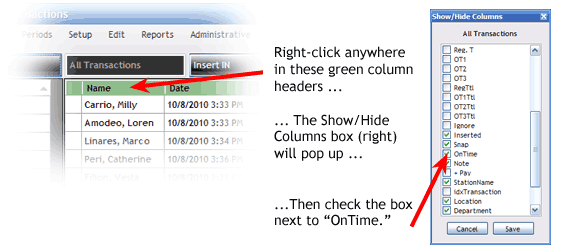
- Can't see the OnTime column? Here's what to do:
- Place your cursor anywhere on the green bar in TimePilot Central and
right-click.
- In the pop-up box that appears, check the box next to "OnTime."
- Click Save.


