Getting Started
Connecting to the Cloud
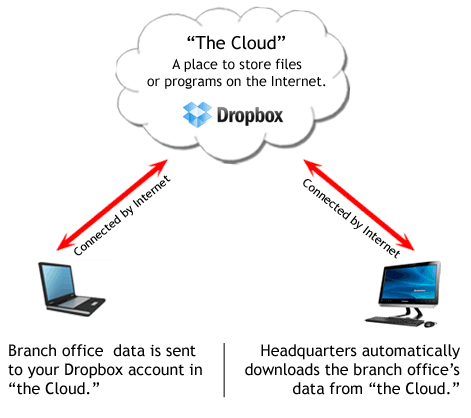
Let's say you have a branch office 50 miles from your headquarters, you have TimePilot systems installed at both locations, and payroll is processed at headquarters. How do you get your clock-in and clock-out data from the branch office to headquarters? You could put the data on a USB drive and bring it there, you could e-mail the data there or you could print out reports as PDFs and e-mail them.
But if you've got TimePilot Enterprise Edition and a broadband connection at both locations, there's another, much more efficient way: linking the two locations through the Cloud.
With this feature, the user sets up an account at Dropbox.com, a free Cloud service, giving both headquarters and the branch office access to the account. The TimePilot software at the branch office will save its transactions to a TimePilot-specific folder in the Dropbox account, and the TimePilot Central software at headquarters will monitor this folder and automatically import these transactions into the TimePilot database.

Cloud setup
Setting up Cloud access on your TimePilot system is a four-step process:
- You'll install and set up TimePilot Central and Clock Manager on your "headquarters" computer. (From this point on, we'll call it your "Local" installation and we'll call the installation at your branch offices your "Remote" installation.)
- On the Local computer, you'll sign up for a Dropbox account and download and set up the Dropbox software.
- Still on the local computer, you'll tell TimePilot Central where in Dropbox to look for the transactions. This is referred to as the TimePilot Cloud.
- Finally, on the Remote computer, you'll install and set up TimePilot's Clock Manager and link it to the Dropbox account on your Local computer.
Step 1: Install TimePilot Central and Clock Manager on the Local Computer
Click here for instructions on installing TimePilot Central and here for instructions on
installing Clock Manager.
Step 2: Download, install and set up Dropbox on the Local Computer
 Go to https://Dropbox.com/register, enter your name and email (yes, that's all they ask for!), create a password and download and install the software. When it's installed, you'll see a Dropbox icon (shown at left) on your desktop.
Step 3: Tell TimePilot Central where to find the data sent by the Remote site
- Start TimePilot Central. Click the File menu, then "Connect to the Cloud..."
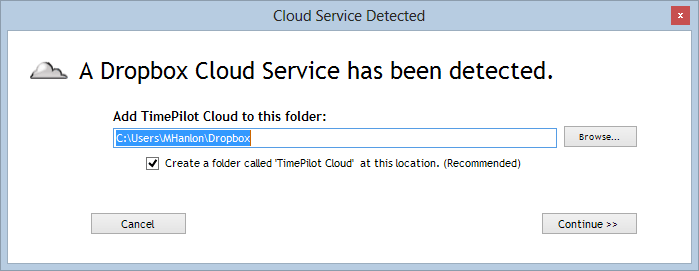
- TimePilot will search the Local computer for your Dropbox folder. When it finds it, you'll see the screen below:

Click the Continue button. TimePilot will create a folder called "TimePilot Cloud" within your Dropbox folder.
- That's it. Setup on the Local PC is complete. Now it's time to prepare the Remote PC.
Step 4: Set up Clock Manager and link it to Dropbox on the Remote PC
- At the Remote PC, open a browser and navigate to https://Dropbox.com/register. Download and install the software. You'll be asked if you want to create a new account or link to an existing account. Choose link to an existing account, and enter the username and password to the account you created on the Local PC (Step 2, above). The files that are in this Dropbox folder will match those in the Dropbox folder on the Local PC. When you install the TimePilot Clock Manager in the next steps, it will automatically detect the correct folder in Dropbox.
- Place your TimePilot software CD in your CD drive. When the opening screen appears, click "Install TimePilot Software." No CD/DVD drive? You can download the Clock Manager Program here then skip to step 4.
- On the next screen, click the second button, "TimePilot Installation Menu," then "TimePilot Clock Manager."
 When installation is complete, exit the Installation menu and double-click the icon for Clock Manager (shown at right.)
- One of the first things you'll be asked is if this installation is on a Local or on a Remote PC. Choose Remote.
- Next, you'll be asked to give the Remote location a name. Every clock-in and clock-out recorded by clocks at this location will include that name when they're viewed in TimePilot Central at the Local computer. If, in Step 1 above, you created a list of locations when you set up TimePilot Central at the Local computer, that list will be available by clicking the drop-down arrow next to the Location Name.
If your location isn't there, click the "Create a New Location" button. On the screen that appears, enter the name of the new location. If you want to password-protect Clock Manager here, click the "Enable Password" checkbox and enter a password. You'll need to enter this password every time you run Clock Manager on this Remote PC. Click OK.
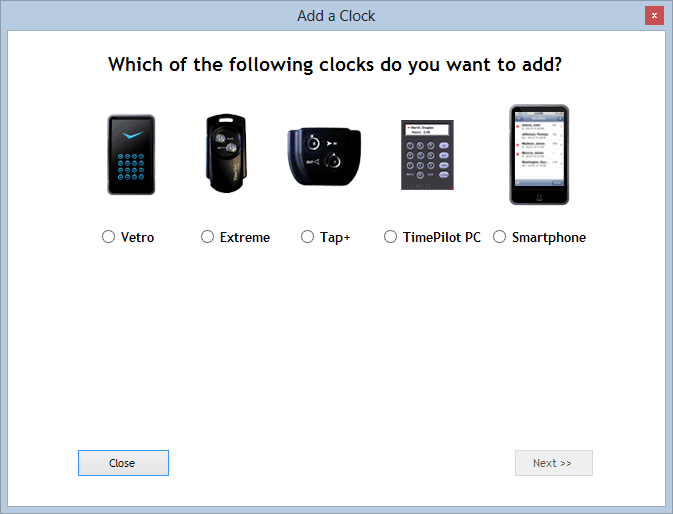
- Next, you'll be asked which model of TimePilot clock you want to add (see screenshot below). When you make your choice, click "Next" and follow the instructions on
the screens that appear.

- Vetro: You have two options when you pick this clock:
- Adding the clock via the USB drive: This choice guides you through naming the Vetro clock and setting a six-digit password, loading them onto the USB drive and transferring them to the clock.
- Adding the clock via a network: This choice allows you to set up your Vetro clock right at Clock Manager, as long as your Vetro clocks are attached to the same network.
- Extreme: This choice guides you through naming the Extreme Blue Enhanced clock and setting the date and time, loading them onto the USB drive and transferring them to the clock.
- Tap+: Because the Tap clock can be used on any computer in your network—and might be moved frequently from computer to computer—there's an extra step to setting up a Tap clock: You'll need to install a small program, Tap Manager, on any computer that might be used with a Tap. You'll get complete instructions on this after you click the "Next" button.
Tap Manager is found on your TimePilot software CD. Place the CD in each computer's CD drive, and when the software starts, choose "Install TimePilot software," then "TimePilot Installation Menu," then "TimePilot Tap Manager." No CD/DVD drive? You can download and install Tap Manager here. Your Tap clocks will appear in Clock Manager
when you plug your Tap clock into a USB port of a computer on your network that's running Tap Manager.
- TimePilot PC: Much like TimePilot Tap, you'll need to install TimePilot PC on each computer in your network where employees will clock in and out using the software. The Clock Manager will automatically "see" each installation of TimePilot PC on your network. Click the "Next " button for complete instructions.
- Smartphone: TimePilot has Apps for the iPhone and Android phones that enable individual employees or groups of employees to clock in and out with their cell phones. Once the smartphones are set up with TimePilot, they will appear in Clock Manager. Click the Next button for details and a download link.
When you're finished setting up clocks, you're ready to go. Click here to learn more about how to use Clock Manager.


![]() Go to https://Dropbox.com/register, enter your name and email (yes, that's all they ask for!), create a password and download and install the software. When it's installed, you'll see a Dropbox icon (shown at left) on your desktop.
Go to https://Dropbox.com/register, enter your name and email (yes, that's all they ask for!), create a password and download and install the software. When it's installed, you'll see a Dropbox icon (shown at left) on your desktop.
