TimePilot Vetro
Assigning iButtons or ID numbers
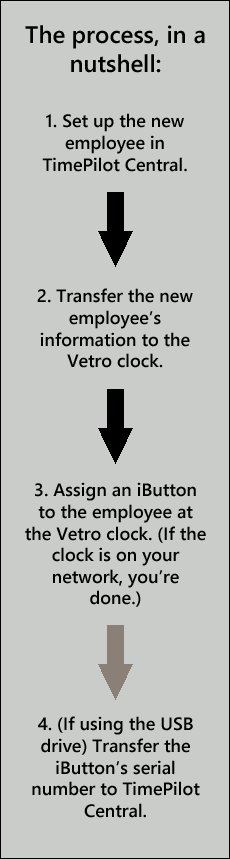
You initially set up employees with
iButtons or ID numbers when you ran the
Vetro Setup Wizard. Later, after you’ve finished using the wizard, you may find
that you want to add more employees and assign them an iButton or an ID number.
For the greatest security we strongly recommend using
iButtons. If you’re using
ID numbers, it’s easier for one worker to clock in another; all they have to know
is their co-worker’s number. Because iButtons are usually kept on an
employee’s keychain, it’s much less likely that an employee will loan another
their keys to clock them in. Note: iButton serial numbers will appear in each employee’s profile in
TimePilot Central after the clock-in and clock-out data is
collected for the first time.
 For users of Standalone Mode (using USB drive to collect data):
- Start TimePilot Central by clicking the icon on your desktop.
- Click the Setup menu, then "Profile Setup."
- Click "Add a Profile."
- Enter the employee’s name and other information by filling in the blanks. Be sure to enter a four-digit ID number of your choosing and click the "Enable User ID Entry" box in the profile’s Identification section. You don’t need to enter an iButton serial number; that will be done at the Vetro clock later in this process.
- Plug your TimePilot USB drive into your computer’s USB port.
- In TimePilot Central, click the Setup Menu, then choose "Clock Manager."
- In Clock Manager, right-click on the image of your clock and under USB functions, select "Transfer Employee Setup." It will write to the USB.
- Wait until the new data is loaded on the USB drive. When the process is complete, remove the drive from the computer and plug it into the USB port on the Vetro clock.
- On the Vetro clock’s keypad, enter Administrative Mode by pressing "99" and then "OK," followed by your Vetro password.
- Select "Read USB Drive" from the menu that appears on the clock’s screen by entering its menu number (3) on the keypad. The data will be transferred from the USB drive to the clock.
If you’re just using ID numbers to clock in and out, skip to
Step 13. If you’re going to use iButtons, continue with Step 10, where you’ll assign an iButton to each employee:
- Select "Assign iButtons" from the clock’s menu by entering its menu number (4) on the keypad.
- Use the up and down arrow keys to scroll to the name of the employee who
will be assigned the iButton and tap the iButton to the "In" or the "Out" probe. The iButton’s serial number will appear on the timeclock’s screen.
- Repeat Step 11 for the next employee.
In the following steps, you'll load your employee data from the
clock onto the USB drive and transfer it back to the TimePilot software, so
both the clock and the software have exactly the same data.
- Press "OK" to return to the Administration menu on the clock.
- Select "Collect Data" from the menu that appears on the clock’s screen
by entering its menu number (1) on the keypad. The data will be transferred
from the clock to the USB drive.
- When the process is complete, remove the USB drive.
- Press ESC to return to the Administration menu, then press ESC a second
time to exit Administrative Mode.
- Plug the USB drive into your computer running Clock Manager. The data
will transfer into the software and your clock and software will be
synchronized.
For users of Network Mode:
- Start TimePilot Central by clicking the icon on your desktop.
- Click the "Setup" menu, then "Profile Setup."
- Click "Add a Profile."
- Enter the employee’s name and other information by filling in the blanks. Be sure to enter a four-digit ID number of your choosing and click the "Enable User ID Entry" box in the profile’s Identification section. Don’t enter an iButton serial number; that will be done at the Vetro clock later in this process.
- Click Save and return to the TimePilot Central main screen.
- Start Clock Manager (Setup > Clock Manager). Right-click the first clock
you want to change, choose "Network Functions" and "Transfer User Setup to
Clock."
- Follow the instructions in the box that pops up to transfer the changes
via Clock Manager.
- Repeat Steps 2 and 3 for each Vetro clock you want changed.
If you’re just using ID numbers to clock in and out, stop here; the process is complete. If you’re going to use iButtons, now you’ll need to assign an iButton to each employee:
- On the Vetro clock’s keypad, enter Administrative Mode by pressing "99" and then "OK," followed by your Vetro password.
- Select "Assign iButtons" from the clock’s menu by entering its menu number (4) on the keypad.
- Use the up and down arrow keys to scroll to the name of the employee to receive the iButton and tap the iButton to the "In" or the "Out" probe. The iButton’s serial number will appear on the timeclock’s screen.
- Repeat Step 10 for the next employee, or press the "ESC" key to return to the Administrative Menu and ESC again to exit Administrative Mode.
Do you want to delete an employee’s iButton or ID code? (This might occur if an employee leaves your company.) Here’s how:
- iButtons: Enter Administrative Mode on your Vetro clock (99 > OK > password), select "Assign iButtons" from the clock’s menu by entering its menu number (4) on the keypad and follow the instructions to clear the iButton. This process will change the employee’s iButton serial number to all zeroes, and you can assign his or her iButton to another employee.
- ID Numbers: Every employee has to have an ID number, but you can prevent him or her from clocking in with it. In TimePilot Central, open the employee’s profile and clear the "Enable User ID Entry" checkbox. Then transfer your changes to the clock either with the USB drive or with the
Clock Manager as described above.
Note: iButton serial numbers will appear in each employee’s profile in
TimePilot Central after the clock-in and clock-out data is
collected for the first time.