In our last issue, we listed all the icons that can appear in the first or second column of TimePilot Central’s Transaction Manager and explained what they mean. If you missed that issue, it’s here.
This time we’ll run down the column headers that can appear in Transaction Manager. You probably won’t see all of them when you start the software, but you can add and subtract them to see exactly the data you want to see. There are two sets of headers; one set accompanies transactions; the other accompanies your employees’ profiles.

In this article, we’ll concentrate on the set of headers that accompanies transactions. First, a few facts:
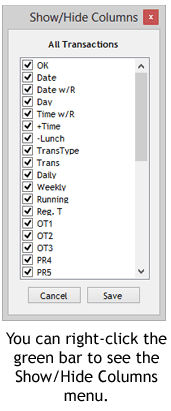 The headers appear in the green or yellow bar at the top of the list of transactions. If the bar is green, that’s an indication that you’re looking at Current Transactions. If it’s yellow, you’re looking at the transactions in an Extracted Pay Period. (What’s an Extracted Pay Period? Click here to find out.)
- You can add and subtract headers by clicking on the “View” menu in the menu bar and then clicking “View/Hide Columns – All… .” Another way to see the list of headers is to right-click the green or yellow bar.
- You can sort your data by clicking some of the headers. The “Date” column lists the transactions in chronological order. If you click the Date header, the transactions will sort oldest to newest; click it again, and it will re-sort, newest to oldest. Other headers that will sort are “Reg. T” (Regular time), “Reg. Ttl” (Regular Total), all the OT (Overtime) totals, all the PR totals (Pay Rate). If you want to sort other columns, you can export your transactions to a spreadsheet and sort all you want. (https://timepilot.com/links.htm#Microsoft_Excel)
- You can add and subtract columns as much as you want. You won’t delete or alter any data by doing so.
Now let’s take a look at the possibilities. You can get a short description of each header by placing your cursor on the header. A tooltip will appear with an explanation. Here’s the rundown, from left to right:
| Heading | Meaning |
|---|---|
| OK | Transactions approved by supervisor |
| Blank | In/Out Status |
| Date | Date of Transaction |
| Date w/R | Date with Rules Applied |
| Day | Day of the Week with Rules applied |
| Time w/R | Time with Rules applied |
| +Time | Amount of time inserted |
| Lunch | Time subtracted for lunch |
| TransType | Type of Transaction |
| Trans | Total time between in and out transactions |
| Daily | Total time for the day |
| Weekly | Total time for the week |
| Running | Running total of time since the first transaction |
| Reg. T | Regular Time amount |
| OT1, OT2, OT3 | First tier, second tier and third tier of overtime hours |
| PR4, PR5, PR6 | Pay Rates 4, 5 and 6 |
| Reg. Ttl | Regular time total |
| OT1Ttl, OT2Ttl, OT3Ttl | Total of overtime hours in first, second and third tiers |
| PR4 Ttl, PR5 Ttl, PR6 Ttl | Total of pay rates 4, 5 and 6 |
| Ignore | If box is checked, transaction is ignored when calculating hours |
| Inserted | If box is checked, transaction has been inserted by a supervisor |
| Snap | If box is checked, this transaction has been snapped as specified in the Snap-To setup |
| On-Time | Gives late/early status |
| Note | If a note icon appears, there’s a note accompanying this transaction. Double-click the icon to read it. |
| +Pay | Bonus pay |
| Clock Name | Name of clock where transaction took place |
| Name of Employee | Name of employee |
| Location | Location of employee, as specified in his/her profile |
| Department | Employee’s department, as specified in his/her profile |
| Company | Employee’s company, as specified in his/her profile |
| Shift | Employee’s shift, as specified in his/her profile |
| SnapToEnable | Snap-To is turned on for this employee in his/her profile |