You bought a new computer? Congratulations!
After it’s all unpacked and set up and Windows 10 is updated (you did do that, didn’t you?), you probably want to get TimePilot installed and running.
Basically, the TimePilot software has two major pieces: the database and TimePilot Central, which works with the database. If you have a network server, the database is probably on the server and TimePilot Central is on a PC. If you don’t have a network, both pieces are probably on a single PC.
(Note: These instructions assume you want to continue using your current database, which contains all your employees’ information. If you want to start again from scratch, see the Quick Start Guide that came with your system or download one at our web site’s Support Center.)
Where’s My Database?
If you’re not sure where your TimePilot database is, start TimePilot Central on the old computer. Click the “Help” menu, then “About.” The “Data Path” indicates its location. (This is why we suggested you temporarily keep TimePilot Central on the old PC.)
Here’s how to make the move:
- If your TimePilot database is on a server, skip this step and go straight to Step 2. If your database is on your old computer and you want to move it to the new one, before you start the installation, copy the folder on the old computer that contains the TimePilot data to a USB drive and paste it onto the new PC’s hard drive. See the box at the top of this page to learn where to find the database folder.
- Using your TimePilot CD, run the TimePilot Installation Wizard to install TimePilot Central and its associated programs (TimePilot Vetro Manager or Clock Manager, Crystal Reports viewer, etc.) on the new computer. Don’t uninstall TimePilot Central from the old computer just yet—you may need it later in the setup process. Can’t find your CD? Our download page is here, or you can contact TimePilot tech support for advice.
- Start TimePilot Central on the new computer.
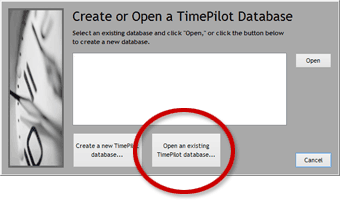
 The first thing the new installation will do is ask you if it should create a new TimePilot database or if you want to use an already established one. Click the “Open an Existing TimePilot Database” button (see screenshot at right) and navigate to the database you pasted onto the hard drive in Step 1 or to the database on your server. See the sidebar, “Where’s My Database?” if you aren’t sure where it is.
- Click “Open” to connect your current database with the new software installation.
- The TimePilot software will probably tell you that it needs updating. It’s important that you follow the instructions to bring your software up to the latest version.
- You’ll also be asked for your software serial number. You can get the number from the old installation of the TimePilot software. Start TimePilot Central on the old PC, click the “Help” menu, and choose “About.” The serial number will appear. It’s also on a sticker attached to the printed warranty information that came with your clock, or, if you have an older TimePilot product, on the inside cover of the user manual. Can’t find your number? Contact TimePilot tech support for advice.
- Now you can uninstall the TimePilot Central software from the old computer or leave it on there as a backup. It’s up to you.
That’s it. Now you can log in to TimePilot Central and start working. Enjoy your new computer!