
 When an employee clocks in, a "Please try again" message appears on the clock's screen, and I get a message in
Hardware Manager telling me there was an error opening AccHours.int file. See screenshot at right:
A. Your product number is the first four digits of your registration number. You can find your registration number on a sticker on the inside front cover of your user manual.
A. No, you won't. The employee and transaction data won't be affected. That information is held in a database that's separate from the TimePilot program.
A. Reports come in three main categories, all of which include multiple options:
A. Yes, you can. What you'll be doing is creating an "export file definition" with just the categories of information you want. Click here to view detailed instructions in PDF format.
A. iButtons have a very long lifespan and are extremely durable. Though they may resemble a watch battery, they contain no power source to run down. They're guaranteed for 10 years, but we've found they usually last far beyond that time. However, like any other product, there is a chance (miniscule in our experience) one could be flawed. Here's how to test your iButtons:
A. Here's what to do:
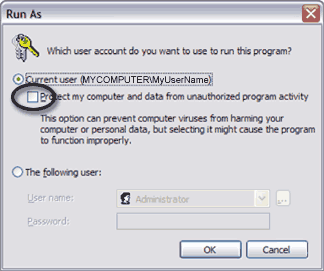
 The box shown at right will appear. Make sure that the “Protect my computer…” box is NOT checked. The TimePilot software
needs to save information to the Windows Registry. It cannot do that if the box is checked, and
that will prevent the program from operating properly.
A: There are three things to check:
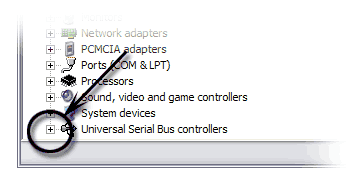
 Expand the "Universal Serial Bus controllers" by clicking on the + to the left of the words (see screenshot at right).
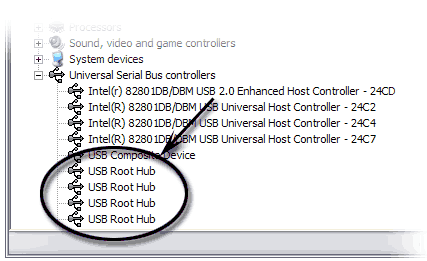
 Right-click on the first "USB Root Hub" item that appears (See screenshot at right) and choose "Properties" from the pop-up menu.
A. This error was triggered by an automatic update to the Windows XP operating system issued by Microsoft that was distributed in July, 2007. To get your TimePilot system working again, update your TimePilot software to the most recent version. Here's how:
This will update your software to the latest version and should eliminate the errors. If the problem persists, run TimePilot's "Repair Database" function, by opening Transaction Manager, clicking the "Edit" menu, choosing "Administrator" and then "Repair Database."
A. The "--:--" is by design and not a problem. It's a signal to the employee that they have created an "exception." What this means is that at some point they did one of the following:
As a result, their transactions don't have the necessary alternating "IN" and "OUT" pattern. (The exception should also be spotted by a supervisor using the password-protected Transaction Manager in the TimePilot software. The software will display the employee's name in red.)
To make the correction, the supervisor will open Transaction Manager, view the employee's transactions and make the appropriate changes to restore the perfect in/out pattern. When the supervisor clicks the employee's name, just his or her transactions are displayed. In the list of transactions, clock-ins are identified by a red triangle to the left of the employee’s name; clock-outs are blank. A perfect set of transactions for an employee will have lines with a red triangle alternating with blank lines. TimePilot will display in red what it believes to be the incorrect transaction.
The clock will display the accumulated hours correctly the next time the employee clocks in.
A: This is typically caused by unextracted old transactions in Current Transactions. It is important to extract your data after a pay period has completed. Any transactions older than 30 days should be extracted or deleted.
A. If you have Transaction Manager running and displaying transactions, it will not automatically refresh with any changes that have occurred since the transactions were last displayed. Transaction Manager is not intended to be a real-time transaction viewer. To see any changes to the database, click on a different employee's name to display their transactions, and then click back on the original employee's name. Any new transactions should now be displayed.
Also, the On Site and Off Site buttons do not create a transaction in the database. To create transactions that are used to calculate time, the employee should use the In and Out buttons and not the On Site/Off Site buttons.
A. This is typically caused by anti-spyware software that may be running on your computer. In particular, a program called Spy Sweeper identifies a TimePilot file called "TPreg.dll" as spyware and removes the file, which forces TimePilot to reinstall when any TimePilot program is launched. To stop this, start Spy Sweeper and select "AD topics" as an item to always keep. This will keep Spy Sweeper from removing this file when it scans your PC for spyware. The exact process or steps in Spy Sweeper depends on the version that you have. Check your Spy Sweeper user manual for details.
A. When viewing transactions in "Current Transactions," the Auto Lunch transactions will not appear, but the Auto Lunch time will be subtracted from the employee time when the total hours are viewed on the clock. (This assumes Auto-Lunch is enabled for this employee. See "Set up Auto Lunch" in the Instruction Manual). When you process payroll, you must first extract your pay period and make any necessary corrections, then click on the Edit Menu and "Insert Auto Lunch Transactions." For details, see the "Payroll Processing" section of the manual.
For the TimePilot Extreme manual in PDF format, click here; click here for the TimePilot Standard manual; and here for the TimePilot PC manual.
Also, make sure Auto Lunch is configured properly. In order for Auto Lunch to work properly, you must do two things: Enable Auto Lunch in each employee's profile and set the appropriate value in the Auto Lunch setup in Configuration Manager.
A. The amount of time subtracted by Auto Lunch is determined by the employee's shift schedule. Use Configuration Manager to edit the shift schedule you assigned to the employee so that the number of minutes between the lunch time Out and lunch time In is correct.
A. Holiday transactions can only be inserted after the pay period is extracted. After the pay period is extracted, open it in Transaction Manager, click the Edit Menu, then "Insert Holiday Transactions." Before you extract the pay period, it's a good idea to open Configuration Manager and double-check that your holiday schedule is correct.
A. It is easier for the supervisor checking or editing their employees' transactions to work without the holiday transactions in the way. We recommend this procedure: 1. Extract the pay period; 2. Make corrections, if necessary; 3. Insert holiday transactions (Start Transaction Manager, then click the Edit menu and "Insert Holiday Transactions"); 4. Create reports for final review.
A. You probably have the In/Out buttons disabled. To enable them, start Configuration Manager, click the Options Menu, and choose "Station Options." That's where you can enable the In/Out keys.
A. The On Site/Off Site buttons probably are disabled. To enable them, start Configuration Manager, click the Options Menu, and choose "Station Options." That's where you can enable the On Site/Off Site keys.
A. You need to enable messaging in Configuration Manager. To do so, start Configuration Manager, click the Options Menu, and choose "Station Options." Click "Enable Messaging."
A. Check the pay period definition to make sure that the beginning of the pay period, including the time of day, is set correctly. To view the definition, start Configuration Manager, then click the Setup menu and choose "Pay Periods."
Also, make sure that each employee is assigned to the correct company. When a pay period is extracted it removes transactions from "Current Transactions" to a defined period of time for a specific company. The removed transactions are now referred to a "Past Pay Period" or an "Extracted Pay Period." All transactions within a past pay period are specific to a company and the period of time.
A. Use Configuration Manager to check the employee's Pay Type and make sure that he or she qualifies for holiday, vacation or sick time. For example, if an employee is assigned a Pay Type that qualifies for holiday time, then any hours inserted either automatically or manually will be added to the "Regular Total" in the reports.
A. Yes. But even though you must assign a shift schedule to each employee, the employee is not forced to adhere to those shift times. A shift schedule assigned to an employee is only relevant if you are keeping track of tardiness or are using the "Snap-To" or "Auto Lunch" function with the employee.
A. The User ID, which is assigned to each employee when they are set up in Configuration Manager, can be modified, but we don't recommend it. (To see a list of your employees' User IDs, start Configuration Manager, click the File Menu and choose View/Print Employee Setup.) The TimePilot software uses the ID to connect all information throughout the software for each employee. If the employee's User ID is changed, then the software will have no name to connect to the old clock-in and clock-out data. If it is absolutely necessary to modify the User ID, you can do so by selecting "Edit User ID" from the "Setup" menu in Configuration Manager.
A. Most of the payroll export modules provided by TimePilot require that the contents of the "Alternate ID" field in each employee's profile match the ID associated with the employee in the payroll software. Therefore, you will need to enter the payroll software's ID number for the employee into TimePilot's "Alternate ID" field. Note: Any changes made to the "Alternate ID" field after a pay period has been extracted will not be reflected in that pay period. To force changes made in Configuration Manager after a pay period has been extracted, open the extracted period in Transaction Manager, click the Edit menu, choose "Administrator" and select "Update Company and Employee Data."
A. The Alternate ID field is used to associate employees set up in TimePilot with any ID numbering system that your company may already be using for the employees, such as within your accounting or payroll system. The ID is simply for your reference.
A. Uncheck the "Active" checkbox in the employee's profile. This will prohibit the employee from clocking in and out but will allow the employees' information to remain in the system for processing payroll. Marking an employee "Inactive" is recommended over deleting an employee. If an employee is deleted, all past information associated with this employee will have no name connected to it.
A. First, call up the profile of the employee who will not be using the iButton anymore and delete the iButton number. Next, assign the iButton to the new employee as if it was a new iButton. This is commonly done when an employee leaves the company and turns in their iButton so it can be used by another employee.
A. In the employee's profile, simply delete the iButton number in the "iButton" number field. This is commonly done when an employee loses his or her iButton and a new one has not yet been issued.
A. Yes, you can modify transactions just as you could before you extracted.
A. In Current Transactions, the default report will encompass all of the transactions within the last 30 days. Any transactions older than 30 days will not be counted. To show the current pay period, select "Extended Time Frame" in the report setup screen and select the desired date range.
A. Check the inside cover of your Instruction Manual. There should be a sticker there that contains your
registration number. If you're still having problems, please contact us.
Back to top
A. In the menu bar, click Edit > Administrator > Repair Data Base. When the repair process is complete, click OK. This should solve the problem.